FabriCAM Software Nesting of Imported Shapes (Part 19) Step by Step Video Tutorial


fabricam nesting imported shapes
Now when it comes to our Mini-Series on Nesting different shapes, there is only one feature left to look at.
The last feature on our Nesting Mini-Series will be on how to Nest Imported vector shapes.
This video is part of a Mini-Series.
Previous video covered Practical; Clear Auto Nesting.
Video Transcript
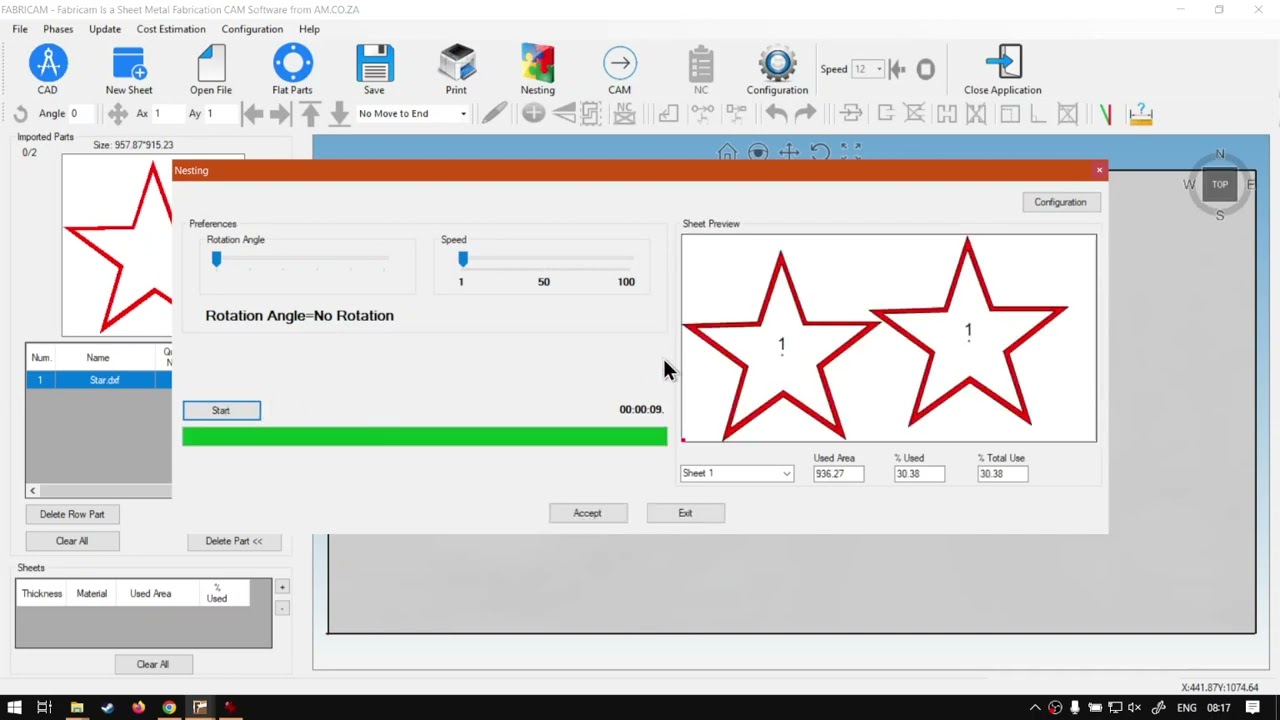
How do you guys in today's video, we're gonna be looking at how to nest imported shapes or parts, and this will be for fabric camp software. But before that, let's have a quick intro first. So today's video can be found on softwaretraining.co.za z. We make sure easy to watch problem solving videos. We also have daily updates always went into the programme here and now in order to import, um, the X files or, uh, next your imported files, we're just gonna have to start a new little project. So I'm just gonna add a sheet. I get 2000 by 1000 and the beam damage. I'm just gonna say to one for now. Now, with our project opened, what we wanna do is we wanna go here to open file. So instead of a flat part, wanna open file, then you want to navigate till you find the shape or vector shape that you want to import. I've got this star that I've created a while ago, and then I'm gonna just say, select now when it opens the shape, it is important that you want to go to on top here to nest or quantity Nest. We're gonna set this one. I'm just gonna say to I don't think it will fit more than two in year. And the rest I can leave the same. Now, if it's high details you might have to go to configuration and click this art part. And it will, um, changes things for you, but I'm gonna just leave it off for now. Say okay. Now, whether selected, I'm gonna say add, and then this should add it to our project. Now, under our project by the star, we can see there, we've got the name and we've got, uh, quantity nesting. We've got two of them available. So what I'm gonna do from here, I'm gonna click next. And then let's preview this So we say start. And then it might run a bit, depending on the quality of the files were imported, its high quality. You might easily wait a minute. Otherwise, this only took us nine seconds. So as we see here, we've got our stars. Now, if these shapes were slightly smaller out so we could try, get away with adding a bit of a rotation and maybe add another star, but I highly doubt we'll be able to fit three stars within this shape. And once you like the settings, you could add a bit of a separation between them if you want it. But I'm gonna leave mine, as is say, Okay, I'll accept. And then our stars will be in here. Yeah, otherwise, that is it. How we import just a nest. Important files. It's pretty straightforward is similar to flat part. The most important part is when you finally added to say the quantity nesting instead of manual quantity. So then but yeah, otherwise that is it on, uh, this tutorial we had to head here to softwaretraining.co.za z. Uh, guys will notice. We've got a variety of different Softwares we do cover. And you can also isolate your search on the top. Right? If you do not, however, find the training videos you're looking forward. Just simply go. Yeah, request the training video filling the uniform, and then we'll do our best to try and make that for you. But otherwise thanks, guys, for watching and, uh


 alex-sheldon-p63g4kQAt_4-unsplash-index
 ayo-ogunseinde-1L5QpkSs5IU-unsplash


