FabriCAM Software the Basic Triangle Shape for CAD (Part 4) Step by Step Video Tutorial


fabricam cad basic triangle shape
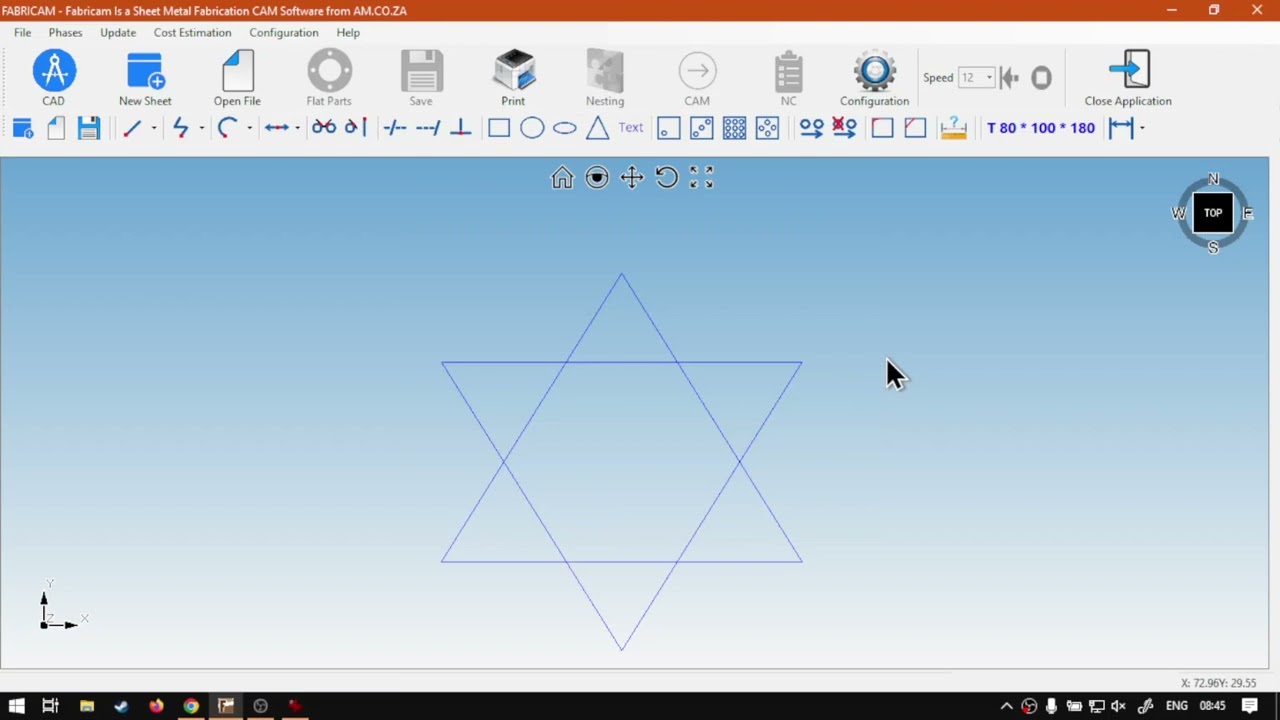
Once again we will be looking at one of those classic CAD building block, the Triangle.
When it comes to the Triangle shape, it will be using the center based origin location on its design.
This video is part of a Mini-Series.
Next video covers Basic Shapes – Practical.
Previous video covered Basic Shapes – Oblong.
Video Transcript
Alright guys. In today's miniseries on basic shapes, we're gonna be looking at the triangle shape, and this will be for the cat feature within Fabric Cam software. But before that, let's have a quick intro first, so today's video can be found on softwaretraining.co.za z day. We make sure an easy to watch problem solving videos, and we also have daily updates. Otherwise, if we head into the programme here now, the triangle shape is, um rather simple. In many ways, it's maybe as complex as the belong. But yeah, In order to do that, I'm just going to select this little triangle icon next, the fourth shape on our basic shapes. And then we zoom out there, click that, and now we have three different options here. So we got a little preview. We can see we've got the W, which is the with H, which is the height of the triangle. And then we've got the A, which is basically an angle. So I'm gonna quickly just set up a basic thing here. Let's make the height a little bit shorter than the worst, so I'm gonna go, uh, about 80 and then we make the worst 100. I'm gonna leave the angle the same. Say okay. And then we want to go to positioning. Select that, and then it will also position. I'll shape with zero being in the centre. So there we go. We've got a basic triangle. You can obviously use this as a building. Block it so I could go. Now we do the same thing. We go 8100, and then make this 1 80. Then I can make a simple starve here just by adding these two triangles. So it's a quick way of making shapes, obviously for design reasons, Um, it's where you want to start without all these intersections. But if you're gonna use this as a quick reference or guide, then it also makes it simple. So you can quickly find the origin point of where you want to place your actual final line. Maybe you created with a poly line or something on that line. But yeah, otherwise, that is it on the triangle, it is pretty, um, really simple and straightforward. If you've used all these ones, then it'll make more sense. Like I said, anything to keep in mind is obviously the calculation of the with versus height, which gets a bit more tricky. Yeah, otherwise, in the meanwhile, though, if we had here to softwaretraining.co.za C uh, guys will notice you've got a variety of different Softwares we do cover, and you can also isolate your search on the top of right. If you do not, however, find the training videos you're looking forward. Just simply go here, request the training video, but in the many form. And then we'll do our best to try and make that for you. But otherwise thanks, guys, for watching and cheers.


 allef-vinicius-wN5YSdsyZDE-unsplash-Index
 kevin-hellhake-lFL-66YWP_g-unsplash-index


