Adjusting the Bitmap Color Mode within the SAi FlexiPRINT RTUV 22 Software (Part 6)

flexiprint bitmap colour mode
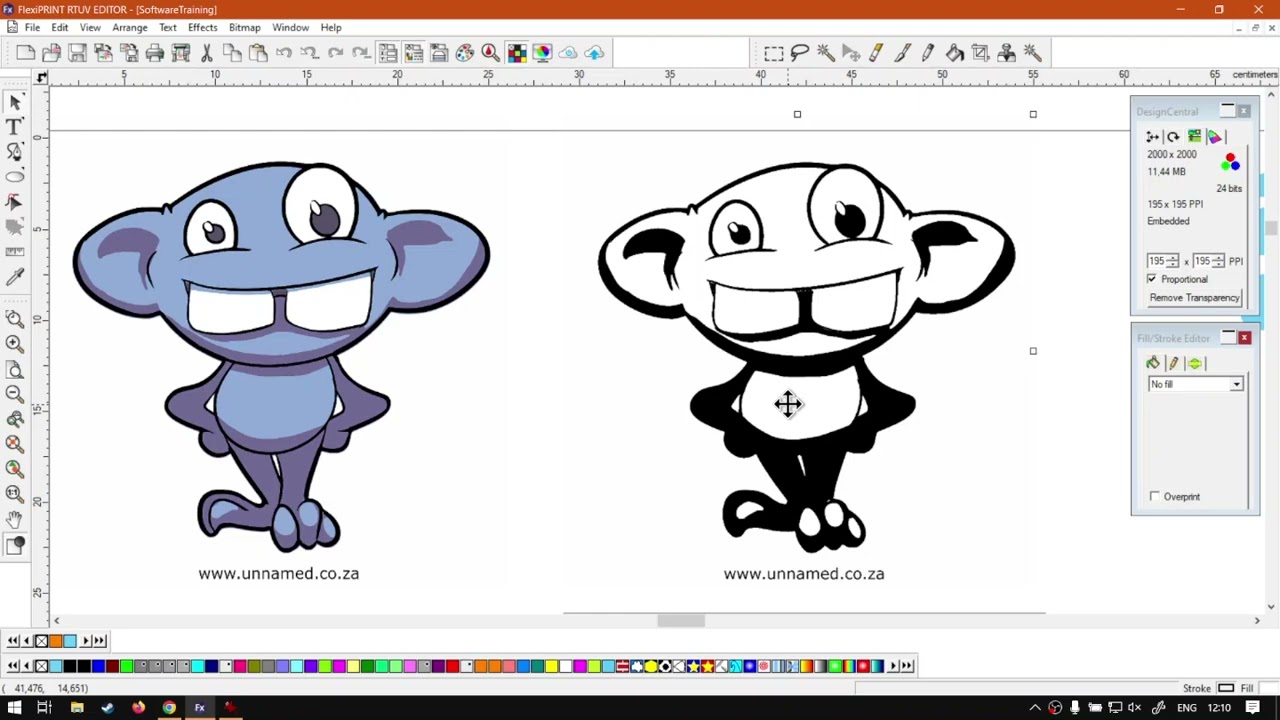
Now that we getting a good understanding of how the Bitmap feature works, let have it displayed correctly.
When it comes to printing Raster and Vector images, the color modes and how they are displayed is very important.
This video is part of a Mini-Series.
Next video covers Filters.
Previous video covered Marquee.
Video Transcript
Alright, guys, In today's video, we're gonna be looking at some colour modes for the but mat feature and this will be with in flexi print. But before that, let's have a quick intro first. So today's video can be found on softwaretraining.co.za. co dot Z A. We make short and easy to watch problem solving videos and we also have daily updates. Now we're into the programme here, so I'm gonna use this little image to demonstrate some colour variations. So now when it comes to colour modes, there's some main ones that you guys might know. So R GB and uh, what is it CNYK So obviously if you work in digital and something like R GB makes more sense. But as soon as you want to print stuff, it is good to have, um in CNYK because we're gonna give you a more accurate representation of what you're actually gonna be printing versus just the digital version. Now there's obviously more colour modes than just that and also depending on the programme. But, uh, flexi print just has a number of them, which we're gonna quickly be looking at. So let's just I'm gonna make a duplicate of this one or copy? Let's copy that. Paste it, throw it in next to it. Now, in order to know which colour you are currently in, can on your design central, you can kind of just go, uh, through these options, you can get a good idea at the moment with 24 bit. And you can see this little icon It's representing that we are an R GB. So, um, how we know that R GB stands for red, green and blue. So R GB And that's how we know which colour mode we are in in other ways with the image selected. If we go to our bitmap, just, uh, wait for this to load. So we've got bit map and then we go down till we find colour mode and we go and drop down and the one that's greyed out. This is the one that's currently set to because currently this is an R GB. So it's good to know that or there's another way we can see that. But something that's also good to know is that let's say we had to change this to something like black and white or grey scale and then change it back to R GB. It is not gonna go magically back to the colours you had. It's gonna keep the colours. Let's say we we in black and white. Then we go colour mode again. I'm gonna do this quick. R GB. Now it's set to R GB, as you can see on the top or right, but we only have black and white colours. That is because the colour profile or information has changed. And now, even though this is the R GB, it is now in a black and white form. So keep that in mind that it's similar to scaling. If we scale something down and we scale it back up, we lose information now. Same with colour modes. If you set your colour mode to something with less colours and then when you set it back, we're gonna lose that information. So it's a handy thing to know. So let's just go look at the different ones. Once again, let's make a copy. So this one we'll use quickly for CMYK. That's the other most common one. So then we go here once again to main menu bit map we navigate down to colour mode and we're gonna go to CMYK. Click that, and we should see a slight shift in values and that it is because it's not compensating for the actual, um, CMYK colours. And like I said, this will be a nice way before you print it. Just make sure everything is still in order, and it gives you kind of more accurate idea of what you could be expecting. Then let's try another one. So yeah, at the bottom, then go to a big I mean, sorry bit map colour. And now let's go. Grey scale. As you can see, what this has done is basically just took the saturation of all the colours and turned them to zero, but has left the values alone, which values, in other words, is the light and dark areas stayed the same and it just removed any colour from our image. Then when we get to black and white now, this is where it's gonna be slightly different. It basically has a form of, uh, value range. You can say that all those colours within the certain value turns to black and wants to another value turns to white. So as you can see we lose a lot of information, but, um, yeah, it gives us just two colours, black and white. So if you wanna create masks and stuff like that, this is definitely a great way to go about it. You can just use the actual black and white colour mode. And the last one year we have is our actual What do we call it? Indexing. This was very popular back in the day with when you just uploaded images to web and you had to be very mindful of your resources. So you don't wanna use too much colours so you could index things and, um, basically choose the amount of colours available. Instead of having the whole colour palette, you can have less and less, depending on your image. So some programmes allow you to set up exactly which colours So you can like really, Um, how can we say, bring that file size down? But these days, it's not that relevant anymore. You can still do it if you want to go for, like, a stylistic effect, that's a it's retro. But, um, most of the times you can just do a normal PNG turf. You know R GB something. I mean, sorry, uh, J Peg or something in that line. And when you're working with web or so forth, you assume the selection. And then, yeah, there's your colour modes RG, BC, MYK, grey scale, black and white and our actual index very handy. Um, these two top ones were the most common ones you're gonna be using. If you're printing in black and white, you could obviously do this and get a better idea of what your values are if they're working or not, and then adjust it accordingly. Yeah, otherwise, in the meanwhile, before we add it on with the bitmap feature, we head here to softwaretraining.co.za. co dot Z A. You guys will notice we've got a variety of different Softwares we do cover. And you can also isolate your search on the top or right. If you do not. However, find the training videos you're looking for, just simply go here, request the training video, fill in the mini form, and then we'll do our best to try and make that for you. But otherwise thanks, guys, for watching and cheers


 alex-iby-cK3c4eL_PD8-unsplash