In-depth Look at the Pattern Fill within the SAi FlexiPRINT RTUV 22 Software (Part 2)

flexiprint pattern fill
Now that we are able to do the classic fill, lets get fancy with the Pattern Fill feature.
When it comes to the Pattern Fill, there are some handy features to customize it to your design.
This video is part of a Mini-Series.
Next video covers Gradient Fill.
Previous video covered Default Fill & Stroke.
Video Transcript
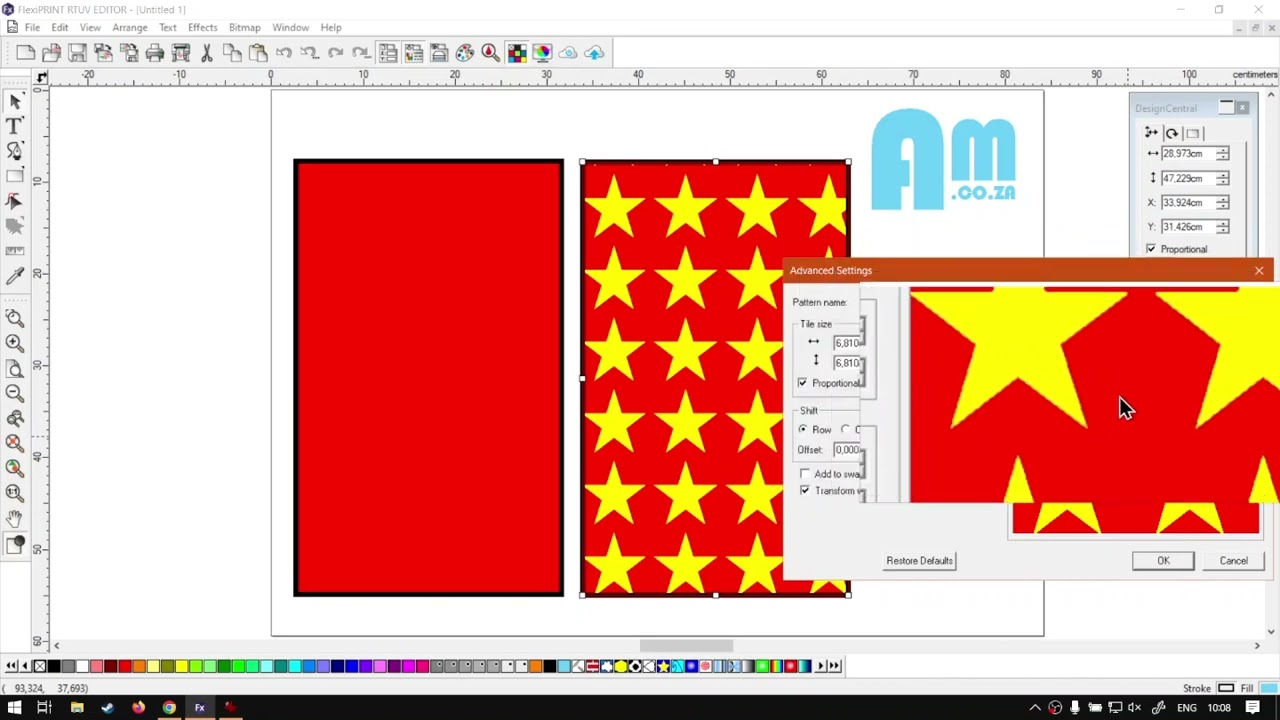
Hi there, guys. In today's video, we're gonna be looking at Pattern full for the full and stroke editor and this will be within flexi print. But before that, let's have a quick intro first. So today's video can be found on softwaretraining.co.za. co dot Z A we make sure and easy to watch problem solving videos, and we also have daily updates. Otherwise we head into the programme here. So now if I had to click this rectangle we've made now, I had to go here to the actual, uh, full and stroke editor. You can see over here we under our full type. We have solid fill under there. We have a few options, So pattern fill is one of them, so we're gonna be looking at that today. So if I had to make a duplicate of this, I'm gonna throw it next to it so we can see the change before and after. I'm gonna select this one and then under this menu, go select the actual pattern we want. Now you can preselect it here at the bottom on the swatch. But these ones are predefined, Where with this, uh, method we can actually set up custom, Uh, a form of custom pattern based off what we have. So I'm gonna go pattern full. You'll see, at the moment we've got a check. It, uh, enable there. So if I go under there or the the steel plate check, then we've got brick cloud honeycomb and so forth, so these ones can be used to create unique patterns. So I'm gonna click a star for now, and then you'll see we have these two options available. The first one is obviously, uh, we just looked at the pattern, and the second one is the background colour so we could do transparent. Um, any other colour. Unfortunately, we cannot change the actual shapes colour, But for now, um, we'll just be looking at the background. So I'm gonna change the background to rate. So we keep the same as the one next to it. Then we're gonna go advance. And this is where we get to, uh, play around a bit more. So I'm gonna go advance and you'll see There's a few things we can set here. We can change the pattern name, which is handy. We've got the tile size, So if you want to increase the size of the stars. Let's say we make this a little bit bigger. I'm gonna go about six and you can see proportional is on, which means if I change one value, we will change it in proportion. You can obviously switch that off to change it. Now it's updated you on the right. But it's not very obvious when you do the tile size, so let's just say OK, we see, uh, it is updated on our actual one. Most of the other previews will work nice, so you don't have to worry about that. And then we can set the colour here as well. Um, but we're gonna leave that at red, and we've got spacing. This will be the spacing between these files. So let's say I increase this to about three. So now on the horizontal, you can see the spacing has become bigger. Let's do the same on the vertical set three, and then you can see. Now we've got an equal spacing right around for that which we can look at and then we've got a shift. So we have under the shift we have row and column. So depending on which one is selected, It will shift it in accordance. So let's go about 10% for now. Click there and then you can see now it's gonna shift our actual rows. But I'm saying I'm gonna go maybe 45. So it's a bit more obvious now if I had to click OK, you can see it is shifting our rows by 45. Now you can obviously do the same with column. But for the sake of this tutorial, I'm just going to keep this one at zero. The default that we were set to. Then we also have this, um, tile offset. So if I'd say let me say OK, reset it. Let's say we want to space this slightly more so it's more centred then, Uh, that's a great place. We can go. We can go tile set the offset. I'm not too sure it will be right here, So let's try about 22 then. So OK, OK, it's a bit much, so let's go. Uh, maybe one could be one point something as well, but, uh, this is where you'll do that and you'll adjust it. There we go. So we have it more centred. Now, as you can see, I've adjusted both the X and Y, so you might need to adjust only one depending on the bottom spacing. So the X will be on the horizontal and the Y will be on the vertical axis. So that is what that is used for. Pretty handy. Then we've got these two bottom ones. The first one is, uh, add to Swatch table. So now if we add to let me zoom here for you guys again if we had to check at the bottom here, we only have one star pattern at the moment. So I'm gonna check this on, and then as soon as we say OK, you will see. Now we have another star pattern. So if I click the blue one, we'll change to that. And, yeah, we click on that one. It goes back to our star pattern. So that way you can have it on your actual swatch table, which is nice. And, um, yeah, so then we also have this option transform with object. So at the moment it's on. So let's just go out here. So let's say I scale this cube smaller. You can see those stars stayed at the same place and they've just become smaller. So, uh, let's undo that. I'm gonna remove this one on the left, make a copy, scale this one so we can see it. Now, I'm gonna select this one, go back to advance on our full and stroke editor. And then now let's switch that option off to transform with objects no longer on say, OK, now I've had to scale this one to a similar size. You will see the actual stars still stay the same size. It just gets rearranged depending on our values we've set. So yeah, that's, uh, pretty much the gist of it. So it's a very handy tool. You can also play with the different patterns and then afterwards add it to your swatch table so you can use it as a quick preset, but otherwise, in the meanwhile, if we head here to softwaretraining.co.za. co dot Z A. You guys are not We've got a variety of different Softwares we do cover. And you can also isolate your surgeon on the top, right? If you do not find the training videos you're looking for, just simply go here, request the training video, fill in the mini form, and then we'll do our best to try and make that for you. But otherwise thanks guys, for watching and just


 arvin-keynes-IPETsB4dcCs-unsplash
 ryan-jacobson-7QpjN5NvS0M-unsplash-index
 valerie-elash-XUT7V_md7sc-unsplash-index


