TruCUT RDWorks the LGP Variable Power Options (Part 20) LGP Design Videos Mini-Series


rdworks lgp variable power
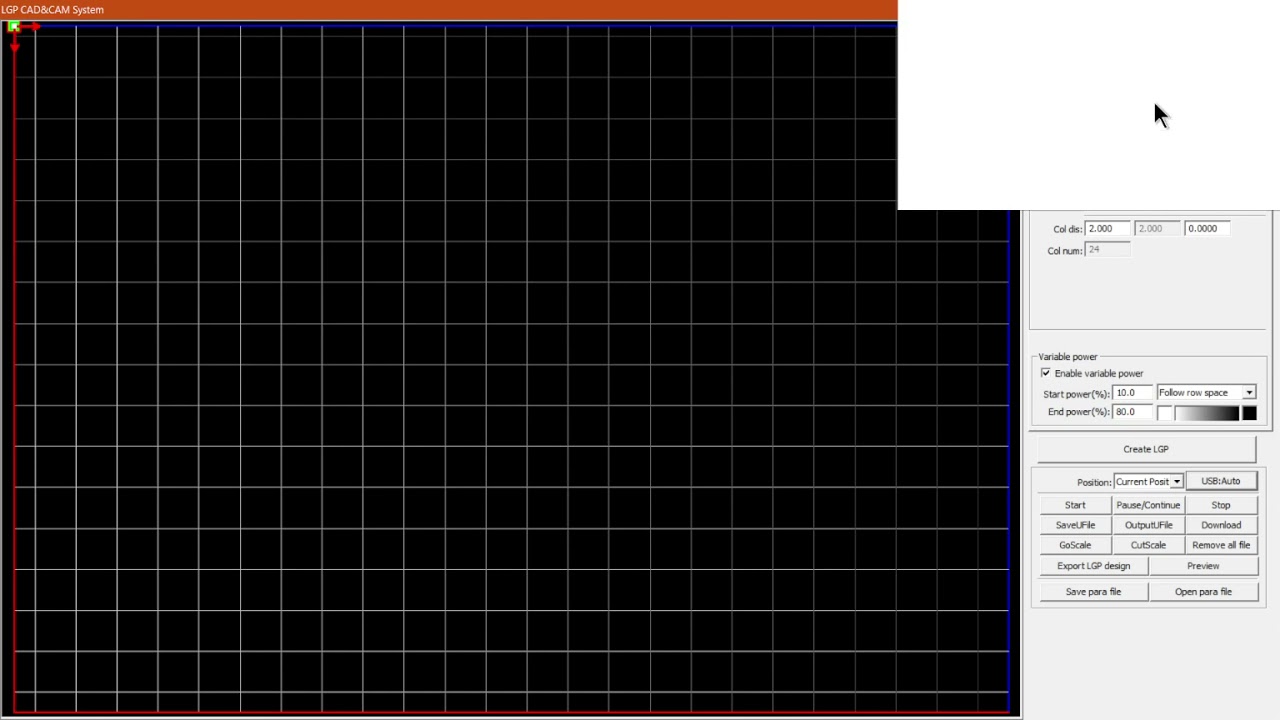
When it comes to the options available for the LGP Variable Power feature, we have gradients, colors, and modes.
This video is part of a Mini-Series that covers the LGP Feature and all its options within TruCUT RDWorks.
Next video covers LGP – Enable LGP Blank.
Previous video covered LGP – Variable Power.
Video Transcript
are you guys in today's video? We're gonna be looking at some extra options for your variable power option that's located within your LDP design feature. But before that, let's have a quick intro first, so today's video can be found on softwaretraining.co.za. We make sure needs to watch problem solving videos, and we also have very updates. Otherwise, back in the programme, Yeah, now the next few options we want to look at for the variable power is the start and end power and then also with two other settings on the gradient and so forth. But before we get that, get to that, I just want to remind you guys that this is a miniseries on the L G P feature and I also leave relevant links in the description so you guys can actually follow along now. Like I mentioned before, I currently use the variable power as a preview to see my light source. The moment we can see, the light is on the top, right? So it's coming down from the top of right here. Once you start playing with these values, quite a lot can change. Um In my personal opinion, I would like to keep them just as it is, because it kind of, uh I'm gonna use it as a reference. But if you wanna start delving into it, you will notice a few things which I noticed as well. So, first of all, we've got here the start, power and and power. Now, you'd imagine it means to start off the light source and the end of it. At least that's the way I view it. But now, if we had to see say, we set the start value here, let's make it as 50%. Um, apply now, signing the end value has gone up by 50%. So it's rather confusing. Go back to 10, then. If we set the end value up, let's say we make this 50%. They will start value. Um, ghost town. You could think that this is just the exact reverse which originally that's what I thought. Maybe if you you know, they are in reverse. So then what you can do is go to the gradient. Here. We set the, um this colour from black to white, and then we do the reverse from white and we go to black. Now if we go to apply, you will see it currently does opposite to what are like positions. It's a top right now. It says Now the lights coming from the top, right? But it's showing us coming from the bottom left. So now we would say Okay, courts are starting. Um, light power. It's now 10%. So let's update. So we get 80% and we make the end like 10%. Sorry. Try that again. 80% apply, and this looks pretty good. So in all fairness, if you're going with the exact values reverse, then it does look right. But then the tricky part comes once again. Let's say the end value. Just make this 50%. So now we want the end to be light grey. You'll say. Now our star has actually gone lighter, Dr. So what I could come down to conclusion is perhaps this works as a gradient in power, so it gradients away to start. And that is why it affects the star power as well. Because just by default settings, it looks great. But once you start playing with the actual end, value starts messing things up. So let's try and take this on two off to make the start 40 put it. And now we can see. You know, we've got something that's way closer to each other. So in my personal feeling, like I said, I have played around with these, But I would say Just leave them as is this one black that one white and leave 10 and 80% especially if you're using it like me as just a preview. Now the other option here we've got is the follow row, and then we've got to follow with. Now with the line, you would see a difference on the grid. You don't actually see a difference, and the lines you'll see a difference. We'll go from a side to just one set direction. No matter what your light sources, and then on the circle it will go from lighting into the outside. When you change this, the next one will light from inside to the outside, so that's pretty much the extra settings for this variable power. But like I mentioned in my opinion, um, I use it only as a preview. Otherwise I would rather keep it off. I'm just in case it does affect my final designers somehow or in some way that I have not noticed. And then, um, this way I'm just sure. But like I said, I will be of great help of any of you have actually used this. And you know what? What The purpose of it is, uh please leave it in the description. Then perhaps we can even make a future video on that. But otherwise, if not quite there. If we go to softwaretraining.co.za hat you guys will notice, we've got a variety of different software to recover. And also you can isolate your search on the top of right. If you do not, however, find the training videos are looking forward to simply go here, request the training video, fill in the uniform. Then we'll do our best to try and make that for you. But otherwise thanks, guys, for watching and cheers